Monday, 30 April 2012

Strawberry and Cherry Cupcakes

Sounds berrilicious to me! These super moist cupcakes are the ones to complete your saturday afternoon. 
Its such a shame the cream started melting when I finally had the time to photograph them - I couldn't resist them! 

Smothered and jam with chewy glacĂ© cherries and topped with a hint of cream, I'm definitely making these again!

Personally, I think that these dainty cupcakes look great on its own. However, you can add some crushed raspberries to the whipped cream to give an even berrier taste and decorate it with an extra raspberry! 


Anyway, here's the recipe:

Strawberry and Cherry cupcakes

Ingredients
50g seedless strawberry jam - or raspberry!
50g glacĂ© cherries
125g unsalted butter, softened
100g caster sugar
2 medium eggs
1 tbsp milk
150g self-raising flour, sifted

decoration
300ml whipping cream
50g icing sugar, sifted
crushed raspberries (optional)

Method
1. Preheat oven to 190C/170C fan oven/Gas 5. Line 9 paper muffin cases in a 12 hole tin.
2. Chop up the cherries with kitchen scissors finely and mix with the jam. 
3. Whisk the butter and sugar with an electric whisk, or beat with a wooden spoon until pale and creamy. Gradually whisk in the eggs and milk until just combined. 
4. Fold in the flour until just combined, then carefully fold in the jam mixture to get a "marbled" effect. Being careful not to over mix the batter, divide the batter among the cupcake cases. 
5. Bake for 20 minutes until golden and risen. Leave it to cool in the tin for 5 minutes and then transfer to a wire rack to cool completely.
6. For the decoration, whip the cream and icing sugar until stiff peaks form. If adding crushed raspberries, carefully fold it in. 
7. Using a star nozzle, fill a piping bag with the cream and pipe swirls onto each cupcake and decorate with a raspberry if you wish.


Saturday, 25 February 2012

A Pound A Day

My goal: the "get a new camera appeal".
I know, it sounds stupidly insane to get x2000 of these:


But theres got to be a starting point in order to get a wonderful dslr!


I've done me maths; I will need 5 years and 8 months to actually get my two thousand. Yes, 5 years and 8 months until I can get one of those ma-hoosive cams. And I might as well drop in my first pound! I'm not sure how long this will last, but I'm gonna be pretty consistent with this one this time...


So....all I can say is come back in 5 years time and check out whether I have my new cam yet! :)

Wednesday, 25 January 2012

Chocolate macarons

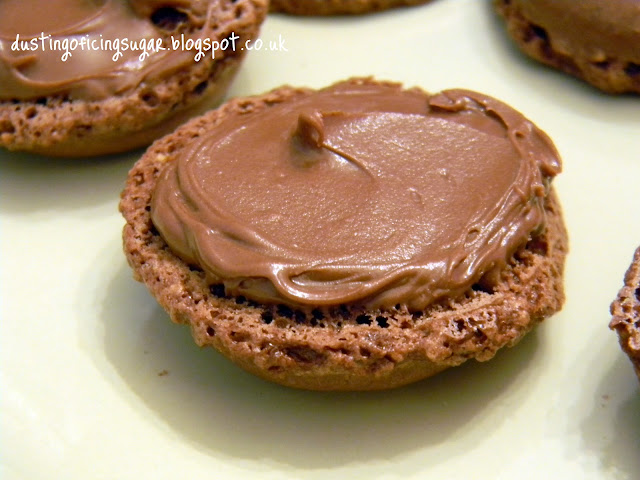
First post of 2012 it is! although the first month has already swiftly passed.... It has been SUCH a busy month - exams, birthdays, events and just random bits and bobs. Nevertheless, I got some baking going, and guess what? - I've started in some big macaron craving!! They have always tasted ever so wonderful especially seeing the different colours and flavours in Waitrose or Sainsbury's but I have never had the idea of making them...until now!


 These macaroons got my head scratching as I knew they were the difficult ones to handle. I have heard various things - don't under-mix your batter, don't over-mix the batter, make sure a "skin" has formed before baking them in the oven etc.. etc.. Oh well, at least these tips haven't put me off yet!


I decided to go with the good 'ole chocolate flavour to start with and decided to sandwich them with nutella. So I started on my macaroon journey. I researched and googled, research and googled until I think I have found the most trustworthy chocolate macaron recipe.  it's all worth the fuss because my macaroons actually looked like macarons on my first attempt!! Overjoyed, I didn't even care if I had to leave them for 24 hours before eating them. And oh my, I could taste all my effort in just a bite of it. And to end this post? I love macarons.


Saturday, 10 December 2011

Sweet potato chiffon cake

Sweet potatoes - great for chips, roast dinners and barbecues. But who would've ever thought to use them in cakes?! I know....it sounds a bit weird but HEY - this is a gorgeous soft cake.


So I googled sweet potato chiffon cake and a range of recipes came up including purple sweet potatoes! I scavenged all around the supermarkets in the UK and had no luck so resorted to traditional orange sweet potatoes. It was depressing not having the chance to achieve the bright purple colours but it was great anyhow.


The texture was heavenly and although the cake didn't taste as potato-ey as I thought it would be, it was alright! It was a very light cake indeed. I originally badly failed on my first attempt due to a VERY - I repeat; VERY silly mistake. The recipe instructed for 100g of sweet potato. I looked on the bottom of the bag holding about 5 sweet potatoes and saw "90g" somewhere. So without weighing the potatoes, I dumped the whole bag in the mix. I thought it was quite light for such few potatoes but I was so excited about making this cake that I just didn't care. When my cake appeared to still be gooey and sticky after baking for over an hour, I realised something must have gone wrong. Later did I notice that the 90g was for one potato, not the whole bag. Great.


Here's the recipe. And make sure you weigh out the ingredients correctly :)


Sweet potato chiffon cake
makes one 7 inch diameter cake

A
3 egg yolks
20g brown sugar

50ml vegetable oil
100g sweet potato (boiled and mashed with 5 Tbsp of milk)
zest of 1 lemon

1/2 tsp baking powder
100g flour
1/2 tsp salt

B
3 egg whites
40g caster sugar
1/4 tsp cream of tartar

1. Peel and cut sweet potato into chunks. Boil until cooked and mash with milk. Leave to cool.
2. Sieve flour, baking powder and salt together, set aside.
3. Separate egg yolks/whites.
4. Mix together egg yolks, oil, brown sugar and lemon zest.
5. Whisk the flour mixture and oil/egg yolk mixture until fully incorporated. Add in sweet potato and mix well.
6. In a clean, dry mixing bowl, beat egg whites, cream of tartar and sugar with an electric mixer stiff peaks form.
7. Add the beaten egg white into the egg yolk batter in 3 separate additions, each time folding gently with a spatula until just blended.
8. Pour batter into a 7 inch tube pan (do not grease the pan). Tap the pan lightly on a table top to get rid of any trapped air bubbles in the batter. 8. Bake in preheated oven at 170 C for 45 minutes or until the cake surface turns golden brown, and a skewer inserted into the centre comes out clean.
9. Remove from the oven and invert the pan immediately. Let cool completely before unmold. To remove the cake from the pan, run a thin-bladed knife around the inside of the pan and the centre core. Release the cake and run the knife along the base of the pan to remove the cake.


Wednesday, 30 November 2011

Vanilla Kisses

You remember my piping nozzles from quite a while ago? I've put them to good use today with these rosettes of buttery cookies.


I've got to say, they were quite hard to pipe in the beginning as the butter wasn't as soft. 
However, warm and crunchy from the oven, these vanilla kisses are worth indulging in, no matter what!


 So...there was a Vienna cream to go with these gorgeous cookies however I thought they were great on its own so I omitted it. You can, of course sandwich the biscuits with the cream if you wish.


And check out my new cupcake cookie jar! Perfect for my upcoming bakes!!

Vanilla Kisses:


Ingredients:
125g butter, softened
1/2 cup (110g) caster sugar
1 egg
1/3 cup (50g) plain flour
1/4 cup (35g) self-raising flour
2/3 cup (100g) cornflour
1/4 cup (30g) custard powder

Vienna cream:
60g butter, softened
1/2 tsp vanilla extract
3/4 cup (120g) icing sugar
2 tsp milk

Method:
1. preheat oven to 200C/180C fan assisted. Grease two oven trays; line with baking parchment
2. beat the butter, sugar and egg with electric mixer until light and fluffy. Stir in sifted dry ingredients, in two batches.
3. Spoon mixture into a piping bag fitted with a star nozzle. Pipe little spirals, about 3cm apart on the trays.
4. Bake for about 10 mins, cool on trays
5. Meanwhile, make the Vienna cream by beating the butter and extract with an electric mixer until white as possible. Gradually beat in the icing sugar and milk, in two batches.
6. Sandwich biscuits with Vienna cream once cooled.


Monday, 28 November 2011

Mixed Spice Biscotti

A mixed spice biscotti is definitely cooking itself up today! They are large, crunchy, almond biscuits, made through cutting the loaf of dough while still hot and fresh from baking in the oven. 


The word originates from the medieval Latin word biscoctus, meaning "twice-cooked/baked. These Italian biscuits smell divine, especially when they come out from the oven. Amazing with a cuppa or great on its own, this nutty treat will send some of you nut lovers off!


Although the recipe may look quite long-winded, its definitely worth a try!

Recipe:
Ingredients:
50g butter, softened, plus extra for greasing
50g caster sugar
50g soft light brown sugar
2 large eggs, lightly beaten
275g plain flour, plus extra for dusting
1 1/4 tsp baking powder
1/4 tsp ground cinnamon
1/4 tsp grated nutmeg
1/4 tsp ground ginger
100g blanched almonds, chopped


Method:
1. Preheat oven to 190C/375F/gas 5. Grease a large baking sheet. Place butter and sugars in a large bowl and whisk together until pale and creamy. Whisk the eggs into the mixture.
2. Sift the flour, baking powder, cinnamon, nutmeg and ginger in the bowl.
3. Add the chopped almonds, reserving 2 tablespoons, and mix together to form a soft dough. Turn the dough onto a lightly floured work surface and, with floured hands, knead for 2-3 minutes, or until smooth.
4.Divide the dough in half and shape each portion into a log shape measuring about 4cm/1 1/2 inches in diameter.
5. Place the logs on the baking sheet and flatten until each is about 2.5cm/1 inch thick.
6. Sprinkle the reserved almonds on top of the logs and press into the dough.
7. Bake for 20-25 minutes, or until lightly brown. Remove from the oven and cool for 15 mins.
8. Reduce the oven temp. to 160C/325F/Gas 3. Using a serrated knife, cut the baked dough into 1 cm/1/2 inch thick slices and place, cut-side down, on ungreased baking sheets.
9. Bake for a further 10 mins. Turn and bake for another 10-15 mins or until lightly golden brown and crisp. Transfer to a wire rack to cool and harden.


Saturday, 19 November 2011

Rainbow Chiffon Cake

AND....after having not blogged for so long, I've decided to show you the most successful rainbow chiffon cake I've done!  It's about my fourth attempt at it and after having deflated or half-cooked chiffon cakes, it was about time I've mastered the basics. 


Do you remember THIS chiffon cake? I wanted to go beyond myself and tried this colourful chiffon cake! the "greeness" has improved..I'd say. "less artificial"?!


Super soft and incredibly tasty, these were gone in a flash! NOM NOM nom nom...........


I have found the recipe from this blog here when I was searching for more excuses to bake up a storm in the kitchen. Check it out and have fun adding some colour to your cakes :)


Related Posts Plugin for WordPress, Blogger...