Thursday, 24 January 2013

Insta-Thursty: week 7

This week has been an extremely chilly one - the snow has dusted over London! And with that, many plans had to be changed including late starts and early finishes for school woohooo!

I have not been instagram-ing much this week except brave the cold, but will share a few photos of the snowy landscape from our little Sunday walk and a quick snap for the 365 photo challenge :)

We took the bunnies out, just for a quick photo, nothing cruel ;) I'm sure they would have preferred it to be snowing carrots rather than snowflakes though!

I love this picture - a classic snow-day-fun

Beautiful.


Love the white specks against her dark coat :)


a snap from our little walk
My Smarties hand.

365 photo challenge - nuts


dustingoficingsugar

Tuesday, 22 January 2013

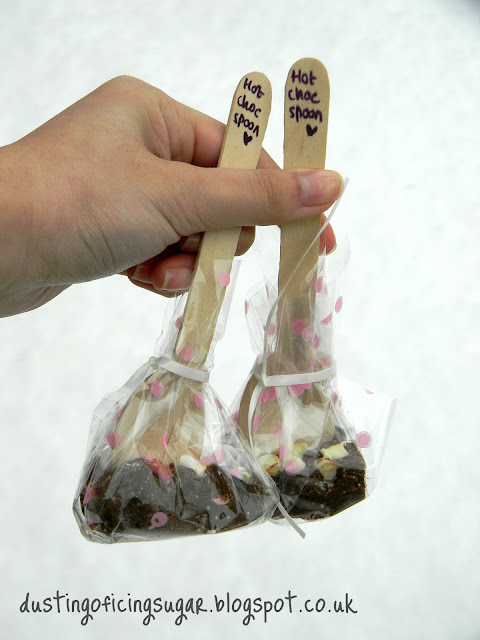
Hot choc spoons.

I promised to share a quick fudge recipe in this post. Oh, and did I tell you that these fudges are magical? You place them in hot milk and it magically melts to make hot chocolate. Lush for the bitter coldness and the snow that has just arrived.

Hot choc spoons - dustingoficingsugar.blogspot.co.uk

I had planned to make hot choc spoons early before Christmas but never got round to it until about a week before. With no double cream left to make the original fudges I hoped to, I somehow landed on the back of a condensed milk tin. *BOOM* I see a future for the chocolate spoons.

Hot choc spoons - dustingoficingsugar.blogspot.co.uk

And there is no catch to these delightful treats. They only consist of 4 ingredients that you would have on hand already and involves no baking whatsoever. I don't see an excuse in these to be honest...

Hot choc spoons - dustingoficingsugar.blogspot.co.uk

It has become part of my routine to come home from walks in the snow, and just pop a choc spoon into my mug. perfect.

Hot choc spoons - dustingoficingsugar.blogspot.co.uk

For the Christmas spoons, I had varied different toppings to make each piece a unique one. I had a mix of sprinkles, marshmallow, choc chips and cookie crumble. Oh the excitement of sugar.

Hot choc spoons - dustingoficingsugar.blogspot.co.uk

Hot Choc Spoons - fudge recipe from Carnation
Ingredients:
374g condensed milk
25g butter
400g chocolate - milk or dark
100g icing sugar

Method: (pictures going from left to right)
1. Break up the chocolate pieces
2. Place condensed milk, butter and chocolate into a medium sized saucepan
3. Stir and melt on the hob until melted 
4. Add the icing sugar
5. Stir until combined
6. Place into a 20cm square tin lined with foil or baking parchment
7. Cut up marshmallows if using or prepare your toppings
8. Arrange onto fudge and chill for 1 hour in the fridge
9. Stick wooden spoons in. Alternatively, you could use wooden sticks/stirrers
10. Remove from tin and cut into desired sizes

Hot choc spoons - dustingoficingsugar.blogspot.co.uk

Will be enjoying a few more of these every evening!

Thursday, 17 January 2013

Insta-Thursty: week 6

During this week, I was lucky enough to be chill-laxed and actually enjoy January after my last exams were over. I have been busily engaged with the 365 photo challenge I previously mentioned here and am constantly trying hard to brush up my photography skills. Please note, some of these photos were not published onto my Instagram; I didn't want to spam everyone with a photo everyday :P 

Oh, how I enjoy looking at life from a different angle :) 

my take on the "colourful food" shot for the 365 photo challenge

my homemade, feastly lunch on Saturday

Starbuck-ing at Westfield with my sister
westfields in the bitter coldness of january

the b-e-a-utiful sunset


365 photo challenge - jumbled.

Hope you've all had a good week!!


dustingoficingsugar

Saturday, 12 January 2013

Chocolate and orange cheesecake

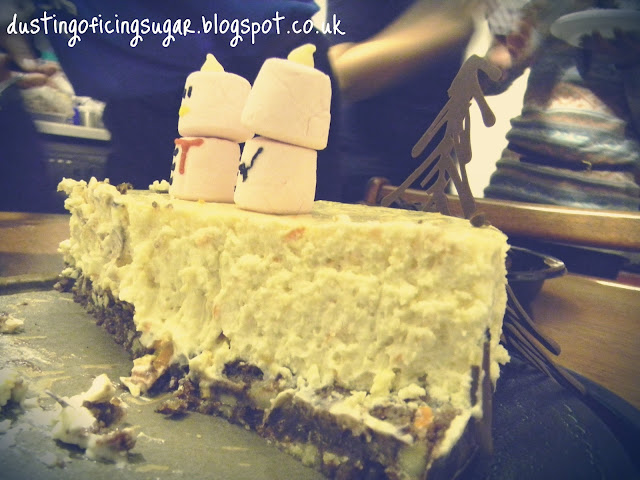
Do you remember this picture? The one with three snowmen standing on a cake and one abused teddy in the background.

Chocolate and orange cheesecake - dustingoficingsugar.blogspot.co.uk

It was from my late new years post here, and from that post I promised to dedicate a whole post to this little sweet beauty: the Chocolate And Orange Cheesecake, which deserves to be written with capital letters - CAOC. As mentioned, I did not get many photos, nevermind ones without a teddy bear lying in the background; everyone was too eager for the cake than for beautiful photographs of the cake.

Chocolate and orange cheesecake - dustingoficingsugar.blogspot.co.uk

As for the decoration, I had piped trees using melted dark chocolate on parchment paper. Seeing as I could only decorate the CAOC when I got there, some of the fragile trees had snapped, boohoo :( Oh well, I guess the three snowmen had made up for it and it is the taste of it that matters :P

Chocolate and orange cheesecake - dustingoficingsugar.blogspot.co.uk

This cheesecake was creamy. It was the cheesecake. I was especially proud of this as no bashing of the biscuits was involved - yes, I made the cheesecake base. Oh and did I mention, it also rose to the occasion and slipped right out of the tin neatly, woooo. 

Orange and Chocolate Cheesecake
Ingredients:

Base:
225g chilled, unsalted butter
250g plain flour, sifted
150g light muscovado sugar
3 tbsp cocoa powder

Topping:
2 oranges
800g cream cheese
250g mascarpone cheese
4 large eggs
225g golden caster sugar
2 tbsp cornflour
1/2 tsp vanilla extract
1 vanilla pod

Decoration:
Dark chocolate

Method:
1. Preheat oven to 180C/160 fan/gas mark 4. Grease a 9 inch springform cake tin, line with baking parchment
2. Cut 175g butter into cubes, melt remaining and set aside. Whiz flour, cubed butter, cocoa and sugar in food processor until texture of bread crumbs. (or rub butter into flour, stir in cocoa and sugar) Pour in melted butter and pulse/stir.
3. Tip mixture into tin, press down. Bake for 35-40 mins until lightly puffed. Remove and cool, lower oven setting to 150C/130 fan/gas mark 2
4. To make topping, grate zest from oranges, squeeze 150ml of the juice. Beat together the cream cheese, mascarpone, eggs, sugar, cornflour, zest and vanilla extract in a large bowl.
5. Split vanilla pod and scrape seeds out, add to cheese mixture. Beat in orange juice until smooth.
6. Pour topping over base and bake for 1 1/2 hours until pale golden, slightly risen, just set around edge but middle should still be slightly wobbly.
7. Turn off oven and leave cheesecake inside with door ajar to cool for 1 hour. Remove and cool completely for 3 hours then chill.
8. For the decoration, melt some dark chocolate and pipe tree shapes onto parchment paper. When set, peel off.
9. Remove tin and place cheesecake on serving plate. Stick on the choc trees using melted chocolate.


Thursday, 10 January 2013

Insta-Thursty: week 5

The first insta-thursty of 2013! The week has started off busy; I have gone back to school with piles of revision and numerous exams..oh the joy of may and june to come.

As of this year, I have challenged myself to the 365 photo challenge where I aim to take one picture everyday according to the selected theme. At the end of the year, if my endurance is high, I really hope to be able to put together a mini photo journal of the year, should be a very good keepsake of my year in photos! Not only this, but I believe it will bump up my skills in photography and allow me to explore capturing things around me. This should be a very interesting challenge!

But as of now, happy insta-thursty!

a cute, mini tree I came across during a little walk through the park

what's more perfect than a Starbucks on a sunday afternoon?

managed to see my good friend after a whole year since she went to California, so happy!
my art coursework in progress - extremely last minute as I chose not to start on it until the day before it was due in; I know I'm a bad girl D;

my painting in progress at 11:30pm.

Although life has been quite stressful this week with exams, coursework and revision, I guess it is what makes me who I am today and I am thankful that I am able to live through 2013 and enjoy life at the same time :)


dustingoficingsugar

Saturday, 5 January 2013

DIY: marshmallow snowmen

Firstly, I had already missed out on saying Merry Christmas here, I am sorry. Secondly, double the sorry for not being able to wish everyone a happy new year on time. Thirdly, I have been longing to share with you all a quick Christmas present idea, great for all ages; however, the prep for the big day had me flying off to the moon so I didn't get round to posting it on time.


Nevertheless, I had already sorted out the pictures so consider this an early idea for a fun DIY Chrismtas, 2013!


For Christmas 2013, you will need:
Toothpicks
Marshmallows
Colourful tube icing
Sprinkles and sugar decoration


This is an easy-as-can-be tutorial so the photos should make much sense without me having to write out every step!

And you are good to go! I have made over 50 during Christmas and have handed all of the goodies after carrying a bunch with me everytime I went to another meet-up with friends and family.


I hope you have all had a smashing Christmas and New Year!


Happy New Year!

Although we have already stretched into five days of 2013, I would still like to wish all my readers a very happy new year. I am also extremely sorry for not even have been able to log on to blog and say merry Christmas due to the endless preparation to kick off Christmas parties and gatherings. I had originally planned to share some fudge sticks and marshmallow snowmen I had made as gifts but did not get round to it unfortunately. However, if you had been following me on instagram, I have shared a few of my Christmas bits and bobs already. But fear not, as this post will be packed full, as I share my fun from Christmas to new year!


Starting with these little goodies, I made around 50 marshmallow snowmen and wrapped them each in cellophane paper and handed them on-the-go as I went to various meet ups. These are oh-so-simple to make and are great for little helpers to join in, even if it's to test some candy.


Chocolate wise, I whizzed up some fudge with an extremely simple recipe that I will post up later on. It involves no baking and only took me around 20 minutes to make (minus the time for it to set).


The next day when it has firmed up, I cut them into little blocks and inserted wooden spoons. I then signed each spoon and wrapped them up in cellophane paper with the help of my sister.

On-the-go presents, done.

As I haven't been keeping up my insta-thursty's very much, here are a few during my Christmas!

My marshmallow snowmen in-the-wrapping!

A beautiful Christmas eve sunset...

...followed by a striking Christmas day sunset

Taken in Kingston whilst having lunch with mummy

Korean dining with my cousins for New years eve

Hot pot with my family and cousins
Now on to Christmas day...


The Christmas dinner had to be taken but not enough justice was given as there were lots more food to this mini feast!


Dessert was like a second party after the turkey and sprouts. I had the honour of baking a cheesecake and decorated it with chocolate trees and marshmallow snowmen from the extra Christmas presents. The mini sponge cakes were baked by my amazing auntie who is a baking queen. And about the chocolate cake....it was bought from Sainsbury's just in case the cheesecake flopped there wasn't enough dessert for everyone.


There's a recipe to follow up from this orange and chocolate cheesecake so stay tuned! And I am also sincerely sorry for the photobomb from the poor toy left on the sofa, as I hurriedly snapped a few photographs before the cake was whisked away to be sliced. Couldn't help but show what a lovely and heart-warming family gathering it was!

And last but certainly not least, new years!

We spent the day with my cousin, playing games and chill-axing at home. In the evening, we went out for another Korean meal after nobody was bothered to cook dinner feeling the grove for a spicy kick.


I have got to say, I was extremely impressed with this restaurant - the food was sooooo good and the price was very reasonable too! 


We had enjoyed the meal so very much and I've got to say, these dumplings had to be my favourite of the evening!


Pancakes were always a yes from us, so they were also considered a must-have everytime.


Unfortunately, this great tasting dish was too spicy for my taste buds to handle so I couldn't have too much of it. However, my dad as a lover for all things spicy absolutely sucked right up to this!


This little bibimbap was simply amazing. A must-eat on our next Korean dining!


This soup looked so spicy and I had wondered whether my cousin was telling the truth when she said that it was not spicy at all. From this, note to self: never judge a soup by its appearance.


And to end this New years dinner, a bit of a dodgy photo that was taken under the pressure that I should hurry up and start distributing the mouth-watering noodles.

Finally, wishing everyone an extremely happy and wonderful new year! And if you're wondering how I got such an excellent view, please thank the television ;)


Related Posts Plugin for WordPress, Blogger...