Thursday, 4 October 2012

Thank you, thank you and thank you.

Firstly for your time and effort
Secondly for your prayers
Thirdly for everything you've done to help us get closer to God.


During the weekend, I had busied myself; cooking up a storm in the kitchen to say thanks to my Sunday school teacher as she will be leaving my class and committing herself to other areas of work.


Contributing towards our thank-you-surprise-do for her, I planned to bake an orange flavoured sponge along with a refreshing buttercream. You like the bunting? I thought it added a nice bit of colour to it!


I believe the sponge was quite a success - soft and fluffy. You could even taste the zestiness from the orange! In the middle of the cake, I layered a thick dashing of orange buttercream and then crumbled on some roughly-bashed chocolate digestives. Gives more of a crunch in the buttery softness :P


I've got to say though, the bad side of this is that I didn't realise how small the cake was - not only was there the entire class but also other people who have come following the aroma of hot, sizzling KFC.


The top of the cake is colourfully sprinkled with a bit of dolly mixture and some bashed-up fizzies. And contrasting with this, I've got the elegance of some "lady finger" sponges wrapped around the edge.


And woah-ho-ho-ho....look at the rest of our food....KFC anyone?!


Tuesday, 2 October 2012

A piece of my heart.

Birthdays = cake. = inspiration.
Sister's birthday = cool cake = lots of inspiration + pinterest.
I had originally wanted to go with a nice sponge and pretty piped buttercream but insisted I stretched it to something people out of the pinterest world would not have seen.


So what you see in front of your eyes is still a birthday cake with buttercream smothered all over it and topped with strange fruit and dolly mix skewers.....and a few mugs and plates from eager cake-eaters.


 ......until you cut it open and reveal a heart in the centre.


Happy birthday to my dearest sister.

[stay tuned for some more pictures!]

Thursday, 20 September 2012

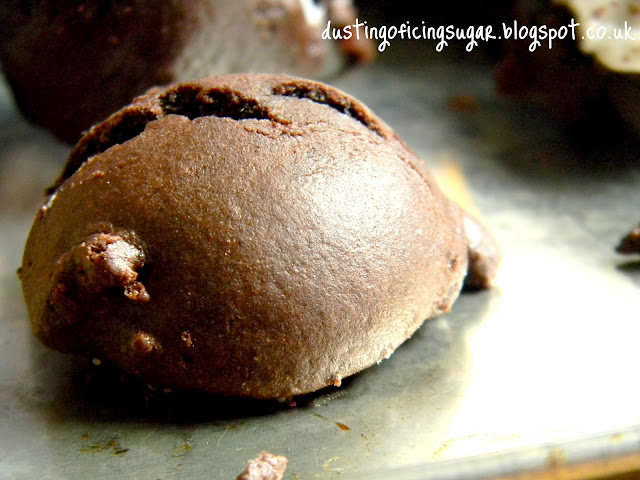
Chocolate Whoopieeee Pies - mini.


Chocolatey, sugary and soft, these mini chocolate whoopie pies are like prized possessions.


So why mini you ask? - it creates an illusion that you're eating less but really you're snacking on a whole box of it when you watch tv. Fact. I don't seem to know how or why these are so extremely addicting...maybe it really is the chocolate..


I also love the fact that each little piece can be made the same size through using a melon baller. I think that's utter genius to be honest with you. Don't know how I thought that one out...........These mini pies are perfect as mini party bites when a party kicks out - uses one egg too!


The original recipe suggests a buttercream to sandwich the delights; but I've thought it out. If I was to snack on these all day, the amount of butter and fat consumed would be rocket high. But if I were to ice them with a refreshing lemon icing, I could eat them all day and not think about exercise but worry about decaying teeth. Anyhow, be proud cos I have managed to consider this in terms of health ;)


I find that the lemon icing also helps to add a bit of zing to the whoopie pies - don't be offended, but pure chocolate can sometimes be a tad too much on its own. I also find that these whoopie pies aren't as sweet as I would have thought them to be so this little drizzle is perrrrfect (or you can add more sugar!).

Mini Chocolate Whoopie Pies
Ingredients:
1 large egg
125g caster sugar
75g butter, melted
130g crème fraiche
1 tsp vanilla extract
1 1/2 - 2 tbsp milk
180g plain flour
70g cocoa powder
1/2 tsp bicarbonate soda
lemon icing - use icing sugar and add lemon juice instead of water

Method:
1. Preheat the oven to 180C/160 fan/gas mark 4. Line two baking sheets with parchment paper
2. Whisk the egg and caster sugar together until thick and light in colour. Beat in the melted butter, crème fraiche, vanilla extract and milk.
3. Sift together the flour, cocoa powder and bicarbonate of soda. Beat into the egg mixture until smooth - it will make a very thick mixture but a pipable consistency. Add more milk if necessary.
4. Take a melon baller and scoop out small balls of the mixture onto the baking sheet, spaced well apart. Use a teaspoon to help you if needed.
5. Bake for 10-12 minutes until risen. Cool on the baking sheet for 1-2 minutes and then transfer to a wire rack to cool completely.
6. Make the lemon icing by replacing the water with lemon juice. Spread onto the whoopie pies. At this point, you can choose whether to sandwich them with another choccie bite or to leave them pretty and iced!

Thursday, 23 August 2012

Breakfast.

Breakfast. I guess it's easy to shove a slice of bread in a toaster and have a simple breakfast, and then starve to death 2 hours later....but I have recently come to realise how hard making a good breakfast really is. I know, it sounds stupid and all, but I find it reallyyyyy annoying cooking up a full English breakfast, especially when waking up at the last minute I can stay in bed for and rushing around the house looking for this and that. Hence, it has been on my to-do list for quite some time. It's easy for some people, let's say to actually bother busting out a frying pan and cracking an egg, and seasoning it, and mix it all up, and actually cooking it to make an omelette. AND there's also the extra washing up unlike the odd knife from buttering your toast. I can go all day long about this until my next breakfast to be honest with you.


So let's get into the main point...
On a very rare occasion, I got woken up by a streak of light yesterday from the early sun through a crack of a curtain. For some odd reason, I could not get back to sleep, even knowing it was 5:30 am. You read that right, 5:30 in the morning. As it happens to most (well me anyway), we see the sunset more than sunrise. I happen to sit on the window ledge this morning, staring at the unfamiliar face of a sunrise. Apart from how beautiful it looked, it somehow reminded me of the sun in telletubies o_O.


Anyhow, the whole house still being asleep and the sun already rising and shining, I had this brilliant idea of making a nice healthy breakfast with lots of bacon and a tablespoon of baked beans. Only to realise, we had run out of bacon from lunch and baked beans, well let's just say not enough was stocked up. I ended up making a traditional cheese on toast. And with that idea clicked in mind and hearing my early riser dad making his way down, I set to a rare making of a healthy breakfast. I managed to scavage some plump strawberries too; into our breakfast menu they go....

So here we have it, a table for two; munched up in the early hours of..7:30 am when I would usually still be snoring. It's progress I'd say......into...well, making breakfast.


And I felt it had went so well that I decided to make breakfast this morning. With bacon this time.

Saturday, 11 August 2012

Tomato and Philly Bruschetta

I don't know whether this post should be placed under a scrumptious brekkie or a light lunch. Maybe a brunch?!


It is definitely a recipe worth doing, especially if you have a tub of Philadelphia cheese on hand! They are so very easy to make - 5 minutes and you've got a sassy dish. It involves no cooking whatsoever (although I prefer to cook my onions in a bit of butter :P) - chuck the bread in a toaster and jam everything together....literally. *no pun intended*


This recipe serves two but it would most certainly make a great party dish or be served as mini "finger bites"! Go get your apron on - you hardly need any cooking skills for this one!!


Tomato and Philly Bruschetta
Ingredients:
6 tomatoes, chopped
half a small onion, finely sliced
2 tsp olive oil
1tsp vinegar
2 slices bread
60g Philadelphia Light with Chives
mixed salad leaves to serve

Method:
1. Stir the tomatoes and onion with the olive oil and vinegar
2. Toast the bread, cut in half and spread with Philly.
3. Top with the fresh tomato salsa and serve with a green salad.


Tuesday, 31 July 2012

Tea infused Cupcakes.

With just a few simple ingredients, you can go a long way...


I guess its really a comfort food. Its one of those things that are so simple; yet so indulging.
As I flipped about some recipes, I was more in the mood for something darling to make - these yummies ticked a lot of boxes!


This recipe calls for Green tea leaves but I guess it is alright to substitute any kind of loose tea leaves for your liking. I've got to say, the flavour of the tea is brought out quite well but I think I would add a little extra or so for those tea addicts.


It really is a great cupcake this - I omitted the frosting as I like to simply dust with icing sugar. But of course, if you prefer a stronger and sweeter essence of tea, feel free to get piping!


This recipe is perfect for everyone, especially because it uses the most popular cupcake making method. But with a spin in the milk, it gives an interesting combo for all.


Bust out your electric whisk and get going, your tea-smelling cupcakes will be on the roll............!


Tea infused Cupcakes:
To make 12:
100ml milk
2 tsp loose green tea leaves
100g unsalted butter, softened
125g caster sugar
2 medium eggs
150g self raising flour, sifted
1/4 tsp baking powder
Frosting:
3 tsp loose green tea leaves
about 75ml boiling water
75g unsalted butter, softened
250g icing sugar, sifted
sugar flowers to top it all off
Method:
1. Preheat the oven to 190C/170C fan/gas mark 5. Line a 12-hole muffin tin with paper fairy cake cases.
2. Put the milk into a small saucepan and bring tot he boil. Add the green tea leaves and leave to infuse for 30 minutes.
4. Using a hand-held electric whisk, whisk the butter and caster sugar in a bowl, or beat with a wooden spoon, until pale and creamy. Gradually whisk in the eggs until just combined. Pass the green tea milk through a sieve into the bowl, then discard the tea.
4. Using a metal spoon, fold in the flour and baking powder. Divide the mixture equally among the paper cases.
5. Bake for 18-20 minutes until golden and risen. Cool in the tin for 5 minutes, then transfer to a wire rack to cool completely. 
6. For the frosting, put the tea leaves into a jug, add the boiling water and leave to infuse for 5 minutes.
7. Place the butter into a bowl and whisk until fluffy. Gradually add the icing sugar and whisk until combined. Pass the green tea through and sieve into the bowl, then discard the tea. Continue to whisk until light and fluffy.
8. Insert a star nozzle into a piping bag and fill it with the frosting. Pipe a swirl on each cake and decorate with a sugar flower.


To freeze, complete the recipe till step 5. Open freeze, then wrap and freeze. When ready to gobble it all up, thaw for about an hour and then top with icing sugar or the frosting.


Saturday, 14 July 2012

A Rainbow Rainbow Chiffon Birthday Cake

I don't really know why, but I felt the urge to assemble a long detailed tutorial on one of my favourite top-notch cakes - The Rainbow Chiffon. I last posted about this combazzled smash-up of colours here but last week, I decided to take this on further and make it into a "proper" birthday cake. 

This cake is one with many-a-flavours. Vanilla, pandan and the good ole' choc. I have decided to frost this cake with Angel Delight, a whipped dessert. It originally came across me to use this creamy treat as a frosting when I saw the idea of using Cool Whip being used in an American recipe. It turned out amazing - Angel Delight using milk as its main ingredient means that it won't be too heavy and as sweet as buttercream or other so and so's. *Brill* What's more, Angel Delight is incredibly cheap and I find it the best to use when I have to finish up a cake quickly and easily (even at someone else's house!) - all you need is milk! *Double brill*
So to make this...... 
You will need: 
about 2 packs of Angel Delight
some sweets to decorate the cake with


First of all, make the Angel Delight. I recommend putting half of the amount of milk it states on the instructions and then gradually building up with the liquid, as you don't want it to be as runny as it normally would as a dessert. Just make sure it can still form peaks.


Next, slice up the cake horizontally as you would normally do to fill up a cake with extra goodness. And also to find that the marbled cake is formed of blotches everywhere.


Spread the filling generously over the half....


.....and sandwich it. Noticing the extra bits that squelches out at the same time.


Cover all sides with the frosting.


And then scream when you have suddenly run out of the gorgeous whipped grub. Make some more and slap it all on, remembering to do the hole in the middle too.


Finally, decorate with sweeties. Please note: using skittles like I have done, is a bad idea. Trust. The colouring starts coming off and your cake will become a disaster!!!! Use chocolate, marshmallows or even fizzers instead. You don't want to find colour dripping down the sides of a neatly frosted cake when you open the fridge - it just shows the many "unhealthy" colourings incorporated I suppose!


I guess I was just that little bit over the top with the rainbows, the colours have exploded into a.....messy mess?


I have chosen to spell out her name on the cake, in addition to her fake age.....just to make her happier with the fact that she is still quite young. ;)


And here it is! A rainbow rainbow chiffon birthday cake!

Related Posts Plugin for WordPress, Blogger...